There’s a lot that goes into building a new roof on top of your cargo van, so we’ve broken down the build into a couple phases. This blog post will be about how we got started.
After researching the different year/makes/models of cargo vans, we found that Chevy had the best reviews. We found a good deal on a 2007 Chevy Express with all-wheel drive– the perfect feature for our winter adventuring. Extending the roof was the first thing to tackle after our purchase, and we soon realized that buying a fiberglass topper would not only be a pricey investment, but it would lack in character compared to the VW Transporter we came from. I have a bit of construction experience, so banking on that and knowing our van’s payload limit was 2,300 pounds, we decided to build a roof extension in a similar manner to the walls of house and attach it to the frame of the van. In all honesty, we didn’t know how it would turnout beforehand– there were no drawings or technical details other than a rough game-plan in our heads. In the end it worked out– hopefully you learn something from our experience:
Step One: Cutting Out the Roof

This was the most unnerving step– once you start cutting, there’s no going back! We had debated if it would be better to build the new frame before cutting out the roof so that we could expedite the amount of time our vehicle would be without a roof, but because we didn’t know the exact measurements of the frame until the metal roof was removed, we opted to make the cut and get a better idea of what we would be working with. Luckily the weather gods blessed us with a week of sunshine. 
My weapon of choice for the roof extraction was an angle grinder– maybe there’s a better tool out there, but it’s what I had access to and it worked just fine. Playing it safe, I cut about four inches from the frame around the back and sides of the van, and ended the cut behind the front cab. After removing this big chunk of metal, I was able to stand inside the van and get a more precise cut to expose the frame of the van where our base 2×4 boards would sit.

Step Two: Building the Extended Frame
 We figured if 2×4’s are good enough for a house they are good enough for a van. We put the studs on 16″ centers with a 5 degree lean to make the walls of the extension match the curve of the van. I wanted to beef up the extension wherever possible, so all the corners have double stacked studs and the openings at the front and back are double plated top and bottom. We used 2×4’s for ceiling joists on 10″ centers and hung them with joist hangers from the doubled top plate at the front and back. The whole frame was screwed together instead of nailed. It was more expensive and slower than nails but with the amount of vibration this frame will see, I did not want nails working their way loose.
We also framed an opening for a skylight with an exhaust fan. This will help bring light into our window-less van, and vent out steam when we cook.

Step Three: Securing the Extended Frame


With the frame on the van, it was time to center it up and clamp it down. I have found that with stuff like this, eyeballing first and then measuring to see if its close, works better than just measuring. Trust your eyes, there is no guarantee that the walls are perfect, and it won’t matter if your tape says its off a 1/16th of an inch.
Once it was centered up and clamped down I drilled holes through the bottom plate and into the frame of the van to secure it. I bolted it in 3 places at the back and in between each stud along both sides– amounting to about 30 3/8th’s bolts. I worked my way form the back to the front bolting both sides at the same time. This made the frame I built flex and match the curve of the van which gave us a nice tight fit and a cool look.
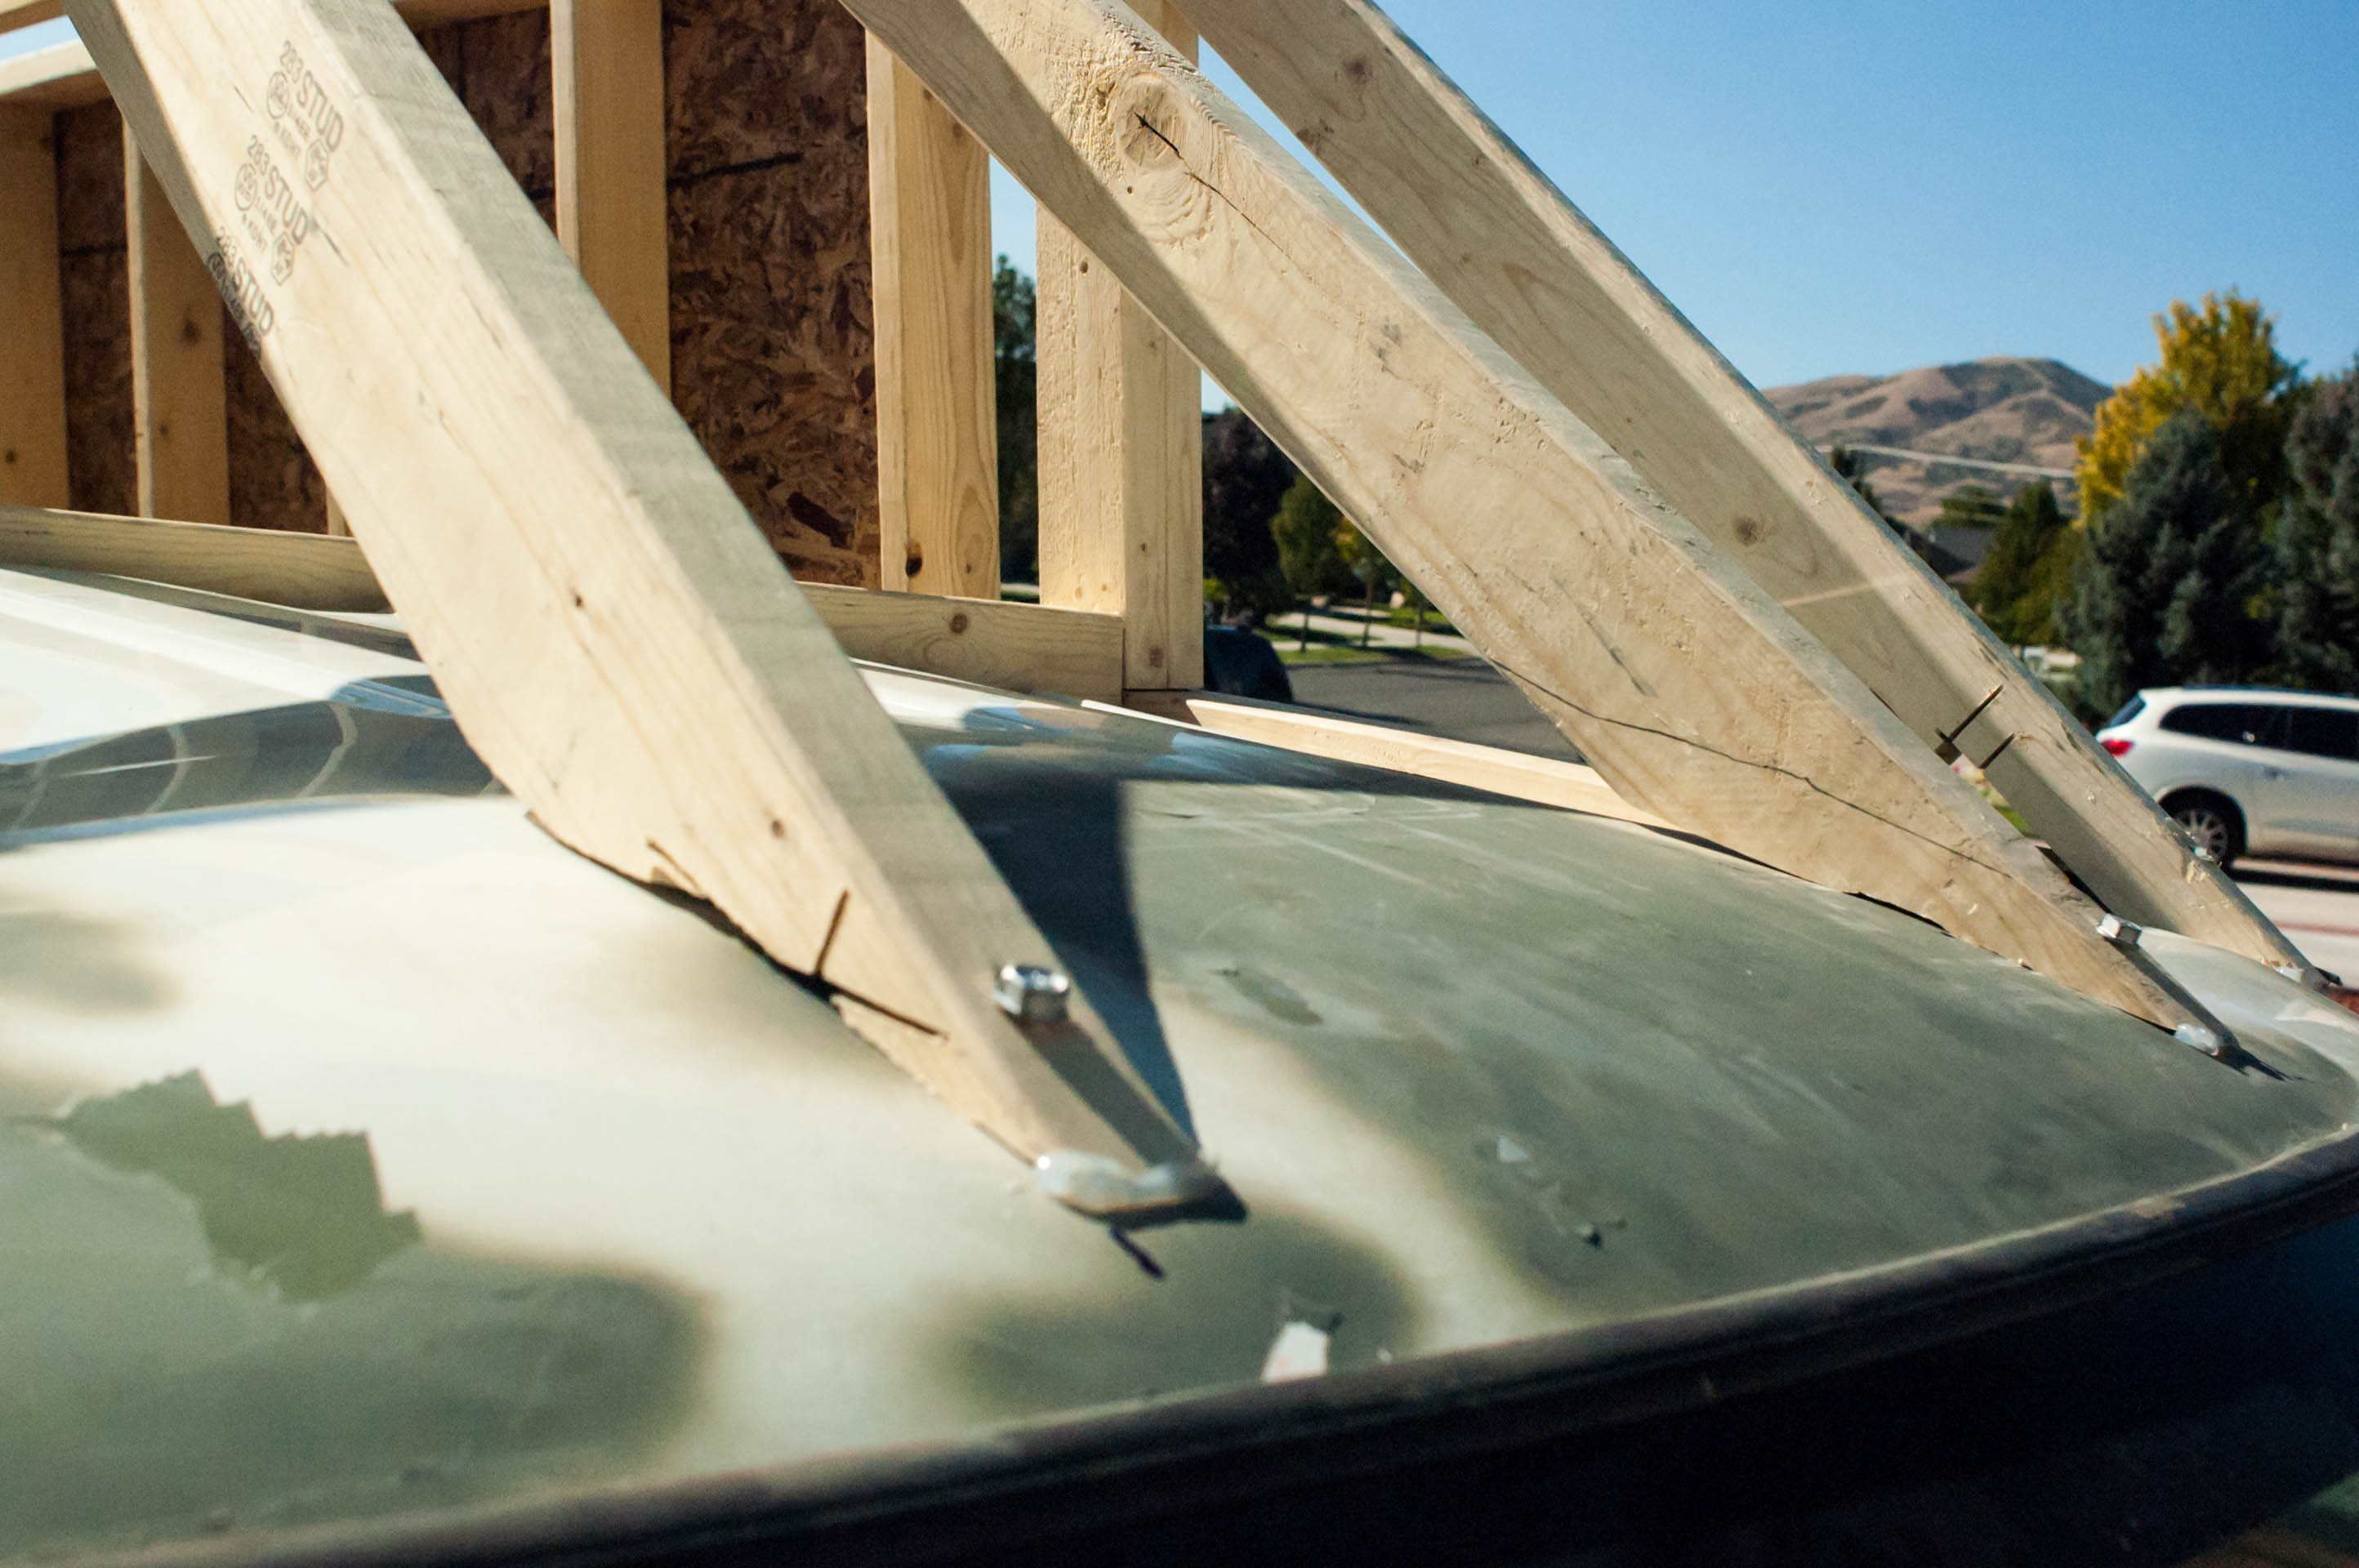 After that came time to cut and secure the joists that go from the top of the frame forward angling down to meed the roof above the windshield. This was a pain! I made the middle two joists even, and the two side joists even. This made for one flat section at the front of the van, while the two side sections angled in. The hope in doing this was to make the vehicle more aerodynamic as well as give the new top an aesthetic flow. There was not room to use a bolt and nut to secure these joists, so I drilled a pilot hole and secured them with 3/8th’s lag bolts that went through the roofs skin and into the frame below.
After that was all done I made sure to fill any gaps between the bottom plate and the frame of the van with silicone so to have a good, solid, water tight fit.

Please ask if you have more detailed questions and stay tuned for how we finished the roof!

Wow great timing. I purchased a dodge ram 3500 van extended and am doing some roof expansions. I’m focusing on a pop up tent type expansion similar to the VW bus.
One thing to consider is with a vehicle unlike a house , you are moving at extremely high speeds so there is heavy wind resistance coming at the van. This is something to keep in mind with your design. A house never has anywhere near that kind of wind resistance unless its a hurricane.
Also will the highway patrol or police flag you for an unsafe vehicle with the wood top like that, or will it look like other work vans on the road with ladders and other stuff on the top of the vehicle?
Look forward to more on the roof expansion, i’ve never seen it done like this. I’ve seen those sports mobile conversion pop tops but those cost 3,000 plus.
LikeLike
We took all that into consideration. Every joint has been reinforced with glue and screws instead of nails. I don’t think we could get flagged for an unsafe vehicle. Convertibles pass a safety test, and jeeps can drive without doors. As long as you can pass the normal safety and emissions test every year you are good to go. The roof has nothing to do with that.
LikeLike
Hi Matt, you did such a great job with this project. Congrats! Its been a couple years now since you posted this blog.
I am thinking of doing this to my AWD GMC Safari Van. I am curious how the top has held up so far on your adventures? Have you noticed anything loosening up such as screws or bolts? Also any significant noise as you drive? Once we do this, there is no going back so I am really want to know if I should continue with wood or go fiberglass which is more flexible. I would really prefer to do this the way you did with the wood framing if its a good long term solution. Just concerned about the wind, rain and snow here in the Pacific Northwest.
I want to thank you for your time in posting this blog with all the building details. So few people actually include the details for a job like this that are needed. Thank you for your time!
LikeLiked by 1 person
Hi Phillip!
So far so good on the van top! Nothing has loosened up, or started to squeak or rattle any more than it did day one. I think having a sheet of steal on the top is pretty key. We treated the wood with sikens deck oil and it’s all holding up really well. I think next summer we will probably do a light sand and re-treat but it’s still looking really good.
Good luck with your build!
LikeLike
Fantastic! Glad it’s working out well for you!
I am excited to start the project and will shoot you some pictures and questions if possible.
Cheers
LikeLike
As long as the construction is solid you have no issues with DOT the main issues with them is safety. I will say that silicone caulk, Believe Me! Will fail. Use a marine caulk for bedding. It is designed to withstand the twisting strain of a boats hull. And the obvious water tightness goes without saying. The finish could be 1/4″ birch plywood with fiberglass sheeting over it once sanded and ready a cheap gun from Harbor freight can spray a gellcoat finish that matches your paint. it will look professional and custom so inspections won’t be a problem. Building a van to suit your needs and taste is a rewarding experience. Enjoy it and go with your creative flow. Happy travels!
LikeLike
Nice work , what do you plan to skin it with?
LikeLike
We skinned it with osb, tyvek, tongue and groove on the sides and 18 gauge metal on top. We have posted a part two that details finishing it off
LikeLike
Oh , part two ,,,,, nice.
Thanks for posting
LikeLike
How tall and how long is this?i got a 3500 express van that i need to do the same. Great job you guys..
LikeLike
It’s the same length as the van, total height added 2’ to the interior and about 2’ 6” to the exterior making the van just shy of 9’ tall
LikeLike
I’m following your guys foot steps and building a wooden roof. I am using a ford econoline extended 350 instead. Currently gutting the van now and getting ready to make the cuts. The curve of the roof at the very end running the length of the van is more then I expected and looks like its gonna be a problem when I try to mount the first 2×4. When you cut off the first section of the roof and then made the precise cuts were you cutting off all the sheet metal and exposing the frame? I’m trying to get an idea exactly where the frame will sit so I can get a measurement and see if in need to angle the 2x4s. Please let me know what you think.
LikeLike
Hi thomas,
Yes I only cut sheet metal to expose the frame. Then I got my measurements and built the 2×4 frame on the ground. For that curve in the back that runs side to side on the van I stacked two 2×4’s vertically and scribed the curve onto one and cut it with a jig saw. Then I just cut the other one to match. That way when they sat on the metal they fit like two puzzle pieces. You can see this in the pics if you look hard. The 4th and 6th photo in the blog post. The 4th pic the frame is on the ground and it really clearly shows it. The 6th pic my dad is holding the cut 2×4’s as we lift the frame on the van.
LikeLike
Hi Matt, finished result looks great. I’m also trying to figure out how to deal with the curvature around the outer edges of the roof. For the boards running driver side to passenger side, the arc you cut into the 2×4 is pretty clear.
What I’m wondering is for the 2x4s running front to back, were these mounted to the front and back 2x4s with some tilt included to help them sit flush with the remaining portion of the roof that they sit on?
LikeLike
Hi Jay,
The boards running front to back along the sides I didn’t cut an arc into. I built the frame on the ground, cut the arc into the boards on the back part and then when I bolted it down I bolted back to front so it flexed the frame to the curve from the front to back of the van. Then when I clad the outside with tongue and groove I had to cut that arc into the bottom peice of T&G.
Good luck! I’m excited to see how it turns out for you!
LikeLike
I am about to do the same thing, is there another episode?
LikeLike
There is a part two to this on our blog. Let me know if you have any specific questions. There are lots of answers in the comments of this and the part two blog as well.
LikeLike
The vandweller go to for sealing any holes in a vehicle roof (vents, fans, bolts) is to use Dicor Butyl tape between the item and your vehicle roof. This is basically putty on a roll which is applied to the roof
over a hole. Cover the bolt heads with self leveling Dicor lap sealant so no water works it’s way down the threads. Silicon sealant will not work.
LikeLike
Thanks man!
I’ll keep that in mind if we have any leaks in the future.
LikeLike
No worries, best of luck.
LikeLike
I’ve lived the VW (1971 tin top) vanlife for 35 years and am considering switching over to some sort of automatic van because my clutch knee is acting up and the VW is getting difficult to drive. Plus, I just want to be able to stand up in the morning. A friend has a Ford Econoline that I played with in visualization on how I would raise the roof and my ideas are very similar to what you have done.
How difficult was it to cut the old roof off? I was considering/visualizing cutting it all the way to the edge and running the support columns up from the floor, but what you did probably makes more sense. How does it do driving in the wind?
I’m glad to hear that it is driving well and staying together. Thanks for the confirmation!
LikeLike
35 years in a VW is nothing short of amazing!
I had originally thought of running support from the floor as well but you loose a lot of space because of the curvature of the van walls. just cutting the roof off was not hard. I used an angle grinder and went through about 5 cut off disks. There are good support frames the run the length of the van sides. I built my extension frame right onto those. As for driving in the wind it drives better than our VW. I think because its heavier.
Hope that helped. Let me know if you have any more questions!
Good luck!
LikeLike
Thanks Sarah!
It hasn’t been a straight 35 years, but it’s been more on than off! And when I was off (in a house or apartment), there were a lot of little road trips! This current segment has been five years so far. And my current VW, which I’ve had for twenty-one years now, is my second!
LikeLike
Awesome build!
I originally thought of doing a welded steel frame as well but could not afford it. Yours looks amazing and I’m psyched to see more custom wood tops out there!
LikeLike
Hey Matt! Awesome job looks great! Thinking about doing the same thing with our van. Just wanted to know how you mounted the frame front to back with the frame top not being flat. Did you cut of the remaining part of the ribs after the main cut?
LikeLike
Yup, under the skin of the roof on both sides are two support beams. I intentionally cut the first hole small so I could stand in the van and more carefully trim the roof material back and expose those support beams. A 2×4 sits on those beams pretty well once you trim the roof back enough. Then you just bolt it down! 🔩
LikeLike
I’m looking into possibly doing this with my van. It’s my first van so it’s a cheap van to test out the lifestyle. I’ve been debating doing this but I’m not sure how much money I want to spend. Approximately how much money did this extended roof cost you?
LikeLike
Just the roof extension was about $800
LikeLike
I am currently building an extended roof(wood) for my 2003 ford e350 extended passenger van. I have used this site as a reference as there is nothing out there about doing such a project with just wood. So, Thank you. I am curious if the way you sealed the base of the structure to the top of the van still remains waterproof… I live in the northwest and am strongly considering some extra steps there with some sort of rubber strip. I also am considering using a resin on the shell instead of siding it. Would you be interested in pictures and notes for your site?
-nicho
LikeLike
Our roof extension is still water tight and holding strong. I think the only thing i would have done different would be to use dicor butyl tape along the bottom of the extension where wood meets steel. I think that would give an extra bit of snugness to that joint and add a bit of waterproofing.
LikeLike
Wow! Thank you so much for posting this!!! You just opened up my world of options! I have been looking for at least a year for the right high top van and this opens up all new options for me! I have a Woodshop and have been building custom things since I was in Middle School! I can’t wait to get started!!
LikeLike
Right on! Yeah it’s still going strong heading into it’s 4th winter. A little creativity and a lot of silicone goes a long way!
LikeLike
Do you also build the extended van rooftop for people and if so, how much would you charge to build it for someone?
*Note: the van I have is a 1978 Dodge tradesman 318.
LikeLike
Hi Sydney,
We do not build our vans. We aren’t set up with a shop to work out of and it’s not what we want to do for a living. I would recommend you look into Roaming Ingenuity out of Fort Collins Colorado. They do awesome work and I can guarantee they will do it faster and better than I could. http://www.roamingingenuity.com/
Cheers!
LikeLike